


在看別人的網誌時,有時會見到有些網誌在文章底部都會有個相關文章功的,有的是純文字,有的的圖文並茂的,純文字的我不會考慮,因為一個網誌要吸引到別人看,先要條件就是有豐富的圖片,人看事物都會先看一些較吸引先,就算連結後的文章有多好,純文字往往因為不夠吸引而被忽略往後的文章,就好像男人看女子一樣,就算對方的內在美有多好,都可能因為她的外表而被忽略對方內在美,只有少數男人會注意到,所以在建立這個網誌前,我已經決定了是一個圖文豐富的網誌!~
請注意:使用這個功能會有些少限制,就是相關文章顯示的縮圖,必需是經Blogger後台編輯文章上傳的圖檔,如果是用其他圖片空間/經URL上傳的,都是無效。
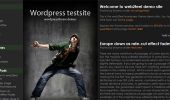
先看看我完成後的效果:(有些地方我改了小許)

第一步:
先到Blogger的後台,按上面『設計』→『修改HTML』進入面頁,把『展開小裝置範本』打剔。
**小提示:在修改範本前記得先下載備份啊!~

第二步:
使用瀏覽器的『Ctrl+F』搜尋功能,找到『</head>』,然後在上面插入以下代碼:
<!--Related Posts with thumbnails Scripts and Styles Start-->

<b:if cond='data:blog.pageType == "item"'>

<style type="text/css">

#related-posts {

float:center;

text-transform:none;

height:100%;

min-height:100%;

padding-top:5px;

padding-left:5px;

}

#related-posts h2{

font-size: 1.6em;

font-weight: bold;

color: black;

font-family: Georgia, “Times New Roman”, Times, serif;

margin-bottom: 0.75em;

margin-top: 0em;

padding-top: 0em;

}

#related-posts a{

color:black;

}

#related-posts a:hover{

color:black;

}

#related-posts a:hover {

background-color:#d4eaf2;

}

</style>

<script src='http://blogergadgets.googlecode.com/files/relatedthumbs19.js' type='text/javascript'/>

</b:if>

<!--Related Posts with thumbnails Scripts and Styles End-->
以上程式碼是控制相關文計的CSS外觀設定, 完成後大家可以修改此處去修改外觀。
第三步:
再搜尋『div class='post-footer-line post-footer-line-1』。
原本教學文章是教人搜『<div class='post-footer-line post-footer-line-1'>』,但因為我後面是『 />』這樣子,所以今次教你們直接搜中間的語法比較好。
然後在下面插入以下語法:
<!-- Related Posts with Thumbnails Code Start-->
<b:if cond='data:blog.pageType == "item"'>
<div id='related-posts'>
<b:loop values='data:post.labels' var='label'>
<b:if cond='data:label.isLast != "true"'>
</b:if>
<b:if cond='data:blog.pageType == "item"'>
<script expr:src='"/feeds/posts/default/-/" + data:label.name + "?alt=json-in-script&callback=related_results_labels_thumbs&max-results=6"' type='text/javascript'/></b:if></b:loop><a href='http://www.bloggerplugins.org/2009/08/related-posts-thumbnails-blogger-widget.html' style='display:none;'>Related Posts with thumbnails for blogger</a><a href='http://www.bloggerplugins.org/' style='display:none;'>blogger widgets</a>
<script type='text/javascript'>
var currentposturl="<data:post.url/>";
var maxresults=5;
var relatedpoststitle="Related Posts";
removeRelatedDuplicates_thumbs();
printRelatedLabels_thumbs();
</script>
</div><div style='clear:both'/>
</b:if>
<!-- Related Posts with Thumbnails Code End-->
基本設置完成後效果圖:

然後講解一下程式碼的功能:
var maxresults=5 『設定最多顯示文章數目』
Related Posts 『可以更改成你想顯示的標題名稱, 例如:相關文章,同類型的文章,您也感興趣...等等。』
CSS 部份在此不作多講了,這個縮圖文章功能自由性也大,CSS部份都好簡易明白,大家可以多作嘗試去設計適合你網誌的式樣。
如果文章沒有圖片的話,都會顯示以下圖示:

所以有些地方是無法修改,如欄位的闊度和高度,除非把以上的js下載來作出修改,然後再上傳到自己的空間,這個等我日後再講解一下!~


0 留言:
發佈留言